The Madden 17 Meta Report aims to provide the community with the most popular plays run online. Whether to help your own scheme or to see what people run in order to help you stop it, the Madden 17 Meta Report can be used many different ways like God’s greatest creation, the spork.
And while it is a long list below it doesn’t come close to fully capturing every play run online. I along with other, better players thought these showed up more frequently than others. So if you have a unique scheme or have gone against one that isn’t on the list below, tweet me at twitter.com/gutfoxx and I’ll try and work it into the next report.
So let’s finish with the intro. Here’s what we think are the most popular plays run in online Head to Head. Special thanks to Owned at Worms and Embrythegh0st for helping out with some formation suggestions.
All art from EA and images from http://maddenfocus.com/
Plays Run In Multiple Formations
The chameleons of the Madden playbook, the first set of plays and concepts are seen in many different formations and sometimes run very differently based on adjustments and hot routes. You will see many of the concepts here in the specific formations I have listed further down.
Without further ado:
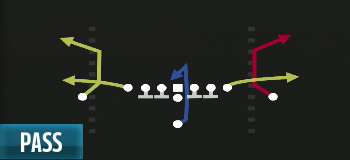
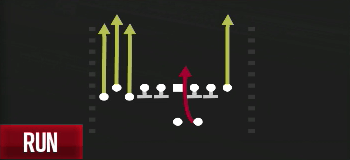
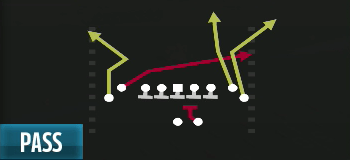
Bench

To run this play you need to read the outside corners. Backed off CBs, go to the out routes, Hard Flat CBs, go to the corner.
Shut it down by having purple zones on top of hard flats. Although purple routes are broken like a married man’s spirit and don’t always cover the corner routes.
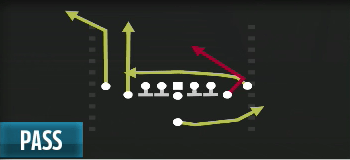
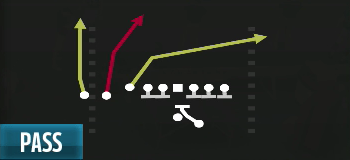
Four Verticals

Anyone who played Madden 16 knows how to run this play. The crossing route is tough against man and zone and the RB gets a speed boost on his route here. There are many different ways and formations that run this. Find one you like and add it to the arsenal.
Many ways to beat it but 2 man under with a DE in a flat route and the user covering the crosser defeats it nicely.
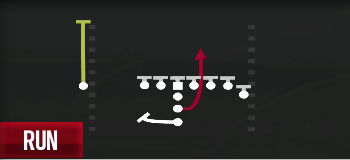
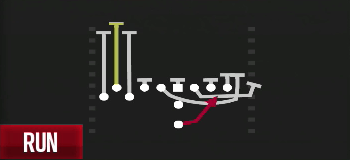
Inside Zone

An OP play in Madden 16, it’s still is effective in 17. It’s a better run when the HB is behind the QB. Many shotgun formations have this play as an audible and it’s a good audible to have, like our sponsor audibl…nevermind. But I will say, the draw play below has quickly caught up to it as one of the top meta runs in 17.
Draw

This play caught me and many others off guard as one of the biggest surprises from the Madden Classic tournament. We saw many competitors use the draw play to pick up good yards on the run. It should be an effective tool in your shed, except those sheds that come off blocks tend to shut it down.
Best used when an opponent is running overload pressure as the players dropping off the line on the opposite side of the blitz give you some nice easy yards to pick up.
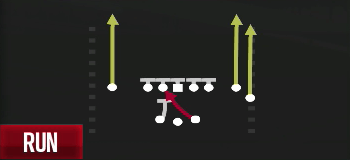
HB Dive

A simple tool for the uncomplicated man. Run it down their throats. Just make sure to pick the right hole. Oftentimes a struggle for many men. The throat hole is good enough here.
FB Dive
FB Dive and it’s kissing cousin Fake FB Dive HB Toss are great tools to pick up a couple yards as well as a couple hate messages when spammed.
Stretch

I don’t think anyone would disagree with you if you said the stretch was OP at the start of Madden 17. It’s been tuned down severely as of late but still it can get you some nice yards when the blocks set up. Be ready to cut inside if the force defender sets the edge too far up field.
HB Counter

Absolutely broken at the start of Madden 17 when run in tandem with stretch, it’s effectiveness has also been tuned by the Madden devs in patches. There are still a lot of instances where if you don’t get a user to the hole or the blocks set up right regardless of what you do on defense, your opponent is sprinting for 80 of the easiest yards he’ll ever pick up.
Trail/Texas Routes
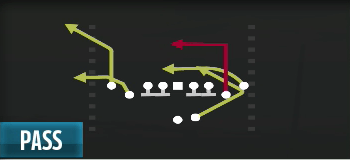
A good way to mix up a user and pick up some yards. Though many top end users will bait you on the drag and go to the trail so watch yourself when throwing it.
Screens
Improvised screens are dead since downfield blocking is, but these screens are often a nice tool to use once or twice a game. Watch the opponents user. Good to use when you know he’s gonna be looking for a deep post or corner route. Many games have been turned on a screen touched by an Urlacher, Barr or Shazier and run for 6 going the other way.
But with these plays you will often find yourself frustrated at your linemen not doing a wonderful job finding blocks. They aren’t as bad as non EA created screens (improvised screens) though. Still, improved downfield blocking intelligence needs to be an area EA looks at going forward.
WR Screens

Great tool against zone coverage, the WRs actually lock on blocks. Get someone shifty to catch the ball and some good run blocking WRs or TEs to lead you to glory.
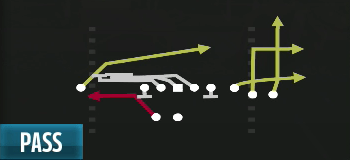
Mesh

Double drags are really hard to stop unless cross manned. They can shade underneath or user them but you can counter that by going to the corner route/post or the other drag his user doesn’t cover.
Anything with a Z and/or wheel route (switch concept)

A ‘Z’ Route is the route from the far right WR. It makes a Z looking shape. It gets in front of the deep safety in a cover 2 and 3. With enough time and finesse you can get it for a 1 play TD against cover 4. It’s a lot harder with less room for error in 17 vs. 16 but it’s still possible when you streak the WR on the inside.
You can also throw the wheel route quick against cover 3 or wait until it crosses over the top of the cover 2 flat zone for a significant pickup.
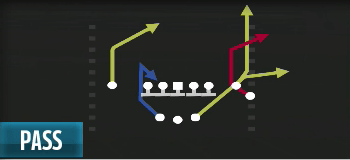
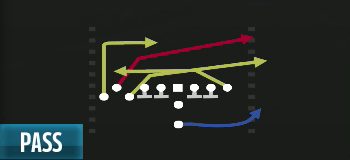
Corner Strike
C routes are love, C routes are life. Any play with a C route on the field instantly becomes better. They kill man and many zones when thrown correctly. On this singleback formation look to the flats first. If they back their zones off too far when the ball is snapped. Easy 4-7 yards.
Z Spot

Corner routes will be a theme of the meta report. In the singleback formation above you can streak the left TE for a clear-out and slant the left WR underneath. This gives you have quick reads to the right and the left.
Gun Split close
From here on out we’ll be going through popular plays in popular formations online. Many of the above are in these formations too but we won’t be going over many of them again. I did include a couple if I had more thoughts on them to give.
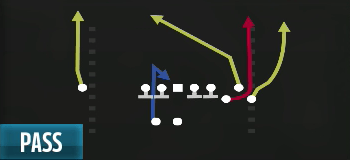
HB Wheel

Skinny posts are hard to cover by the CPU. They need to be covered by the user so any time we get a “must user” route we want to exploit it.
So slant the far right WR and choose either to throw under the user with the slant or over him with the skinny post. The flat route and corner route make a nice flood concept. The flat route is usually open because most people leave their coverage on cloud flats and not hard flats.
PA F Slide

I see this run both stock and by slanting the left WR to try and confuse the user by giving too many levels and crosses to cover.
WR Corner
You don’t see this much anymore because the post and C route get too close to each other. This makes it more dangerous to throw with the amount of top end users out there.
FB Inside/Power O for runs

The FB dive is only in a few PBs like the Steelers. So the main run out of split close is the Power O. It needs good run blockers and a patient hole finder to work.
Gun Bunch Weak
PA Post

Post pattern again…notice a trend? C route on the backside to defeat man and get over the top of cover 2/3 flat zones and in front of deep zones. You can either streak the TE, drag him or leave him on the flat depending on what part of the field you want to exploit. If left on the flat, throw earlier rather than later.
Verticals
Fade the inside WR, motion the wheel route out, wait until he fully sets, throw quick against cover 3/4, wait a bit against cover 2 and hit it over the top for a huge gain.
Best covered by manning up that outside WR and usering the post.
Z Spot

Similar to the z-spot mentioned above but this one has a Z route on single WR which allows for a nice backside throw inside the CB and under the safeties with a down and right pass lead. You also have a corner and flat route on the right creating a sail concept and the delayed hook in is a nice check down.
Gun Bunch TE
PA All Cross

Fade TE and watch the levels. Generally the drag route is going to be open first. Cross manning or a good user jumping from level to level like Mario works well against it.
TE Corner

Posts and corners are a big part of the meta. So a play that matches the number of posts and corners to a Bengals fan’s IQ will give us a lot of options. It can be run a bunch of different ways besides stock:
- Motion the left inside post route to the outside left to give a post/corner concept on left.
- Streak TE on right, drag the corner, motion out the out route and slant it. Levels concept with a delayed slant.
- Motion the corner route on left to the right of screen, streak TE, in route out route, block HB and wait for the post to get behind cover 3 for 1 play TD
- Streak left post route, slant TE (optionally motion him out right.) Look for quick high pass to streak, then either out route and corner route and finally slant route coming across middle.
- Streak out route on left, drag TE for flood concept.
- Many other variations, it’s versatile play
Draw
Great against guys who send pressure off an edge and drop linemen into coverage. Run to the guys that are falling off the LOS and you’ll pick up some chunk yardage like yards picked up my chunks in college. Okay that was a little too far.
But the draw is great for this meta of overload pressure. It works really well in Gun Bunch TE and it’s why I’m highlighting it again when it’s already been talked about it above. We saw this formation and this play run a lot in the Madden Classic.
Singleback Deuce Close
HB Wham

A solid run play that traps the DT with the TE like a girl at the club with an Adam’s apple traps unsuspecting sailors. Will be shut down by a pinched d-line and sober friends.
PA Misdirection

You can either leave it stock and look to the TE in the flats or run it with a few audibles. I use it 80% of the time with the TE on the left slanted, RB blocked then look slants to post pattern. But with the stock post and corner you have multiple ways to skin this cat.
TE Angle
Block RB, reads in this order are quick high pass to streak, drag route, trail route, corner route.
User it by baiting drag route to trail route.
Gun Tight Offset TE – Rams/Saints playbooks
Rams Y Out

Another play another post pattern. The TE out on the right destroys man coverage as it’s a speed out. I frequently run this play with the left corner in a slant, the right TE in a streak, motion out the drag and look to the levels concept and hit the post if the user is no where near.
Spot Corner

Can be run stock or with minor adjustments. Reads for running it stock are flats, corner on right, C route on left, check down to WR in the middle.
Singleback Jumbo
Counter Wk

Make sure you have good blockers out there at TE and WR. You also need speedy guards and tackles to pull. Wait for the blockers to engage and run behind them. I didn’t say this above but hold off right trigger until you are past the LOS.
Singleback Bunch
PA End Around

It’ll never be as good as Madden 15 but the RB gets a nice speed boost out of the backfield. Look there first but if the guy is in cover 2 hard flat the TE is a great resource over the top. Just watch out for that pesky user.
Seattle

You can copy the description here from the verticals in the gun bunch weak above. I won’t do that because it’s plagiarism but the plays are run almost exactly the same. Coming out of the singleback bunch just offers more variety to your offense.
Pistol Bunch TE – See video breakdown:
Verticals

Watch the video above. Usually you want to slant the TE.
Against cover 2 it’s a one play TD with the wheel route WR. Against cover 3 you can slant the streaking middle WR for levels concept. Always take what the defense gives you. Even if that means going back and back to the HB drag route.
Strong Power
Good mobility on your guards is essential here. Will Shields is not the guard you’re looking for. Usually run flipped to the WR side, you can leave it as is if they stack that side with defenders.
Cross Drags
Crossing patterns offers levels concept. We’ve touched on levels frequently in the Meta report, avoid the user and you should be golden.
I form tight pair
Power o

Power runs from I form seem to be the rage online. The pulling guards help seal off any run fits you might have in that hole. Backside pursuit and front side usering help to muddy the hole can effectively shut this down.
Full back dive (with the hurdle)

We talked about the FB dive above, but this one is frequently run with a TE or HB that has over 90 jumping like Jimmy Graham. You can left trigger jump over the line and pick up an easy 4 yards this way. This type of run seems like it’ll be nerfed in a patch. A potential fix is to increase the fumbling chance to near what regular dives have now.
Counter

The counter was touched upon earlier like a drunk uncle tends to touch you in the fun parts but I wanted to highlight it out of this formation because you see it out of this I form as much as you do out of other, similar formations like the singleback. It’s equally effective from both so watch out. A good user is needed to get in there to cry havoc and let slip the dogs of war.
Gun/singleback Snugs
PA Cross
This play is standing in for any play with that deep corner type route on the right. I see the route out of snugs a lot because of the streak distracting the user and the drag across the middle bringing the flats and purples downward. Anything with that sort of deep corner route kills cover 2. The light blues and purples do not cover it well at all. You can find this in the Steelers and Saints PBs to name a couple.
Gun Ace Twins
Levels Sail

We’ve talked about the sail concept ad nauseum in the Meta report. The arrow out of the backfield is strong especially when combined with a corner route. You can motion over the Middle WR to the far side and streak him to act as a clearout but I don’t mind running it stock. Streaking the TE on the left and dragging/slanting the WR underneath is another good clearout read to make.
Posts

HB angle routes are great. The post and corner routes also good. This play has a lot of what we like in 17, giving us pretty simple reads.
PA Verts
Another formation, another one with verts. Slant the TE and baby we got a stew going.
In Conclusion
I hope you all enjoyed the first rendition of the Madden 17 Meta Report. Let me know what I can do improve it in the future. Comments below are helpful. Tweet me with any suggestions and make sure to check out my channel at youtube.com/gutfoxx and twitch.tv/gutfoxx to watch me run a full meta offense.
